Computational Craft
3D Printing Interventions
Home
G-code editing:
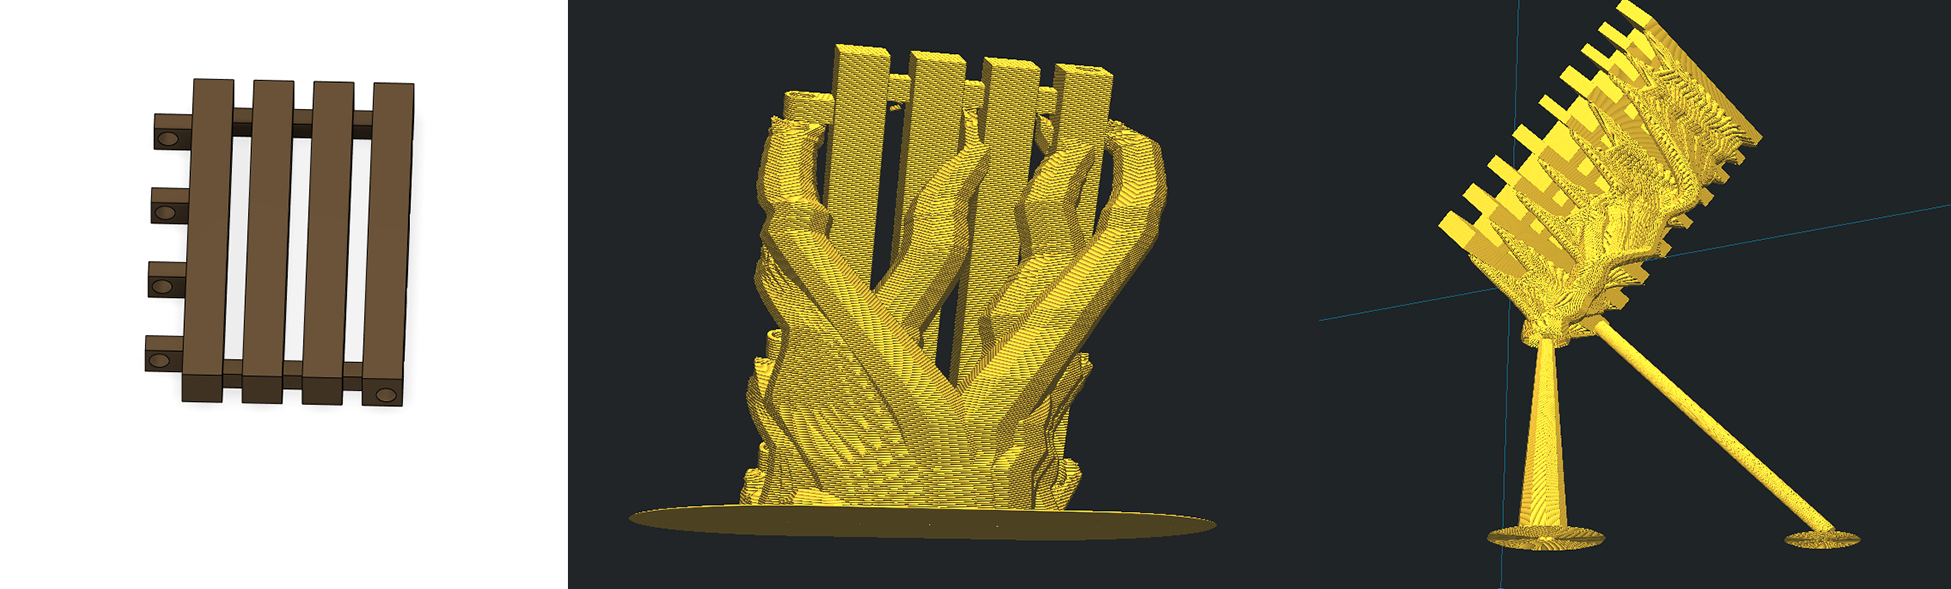
Main idea is to develop a method of controlling the "Tree Support" feature in Cura.
This is an experimental feature in the Expert Mode Settings and is intended to be a way of generating support that uses less material than conventional support structures generated by Cura.
The intention with this is to make the generated support the final product and learn to control this generation process through the model you make in Fusion.
Material Intervention:
What I've learned so far is that the most effective way of generating a lot of this type of support is to create a relatively thin model with a lot of overhang. An important thing to note is that if you wish for the model to be suspended "in air" within Cura then it must have some kind of solid length extending down to the print bed. This is purely so that Cura "thinks" that the model is as low as it can be.
Another possibility could be to use a printer that has a dual extrusion head, Such as the Ultimaker 3, and then set the model and support to be printed in two different materials and then remove the model material so that it only prints the support.
The most change I've been able to achieve is by changing the:
- rotational position of the model
- Tree support branch angle (usually ~40-80°)
- Tree support branch diameter (essentially changes thickness of the support structure which can be used to make more solid structures)
Production Intervention:
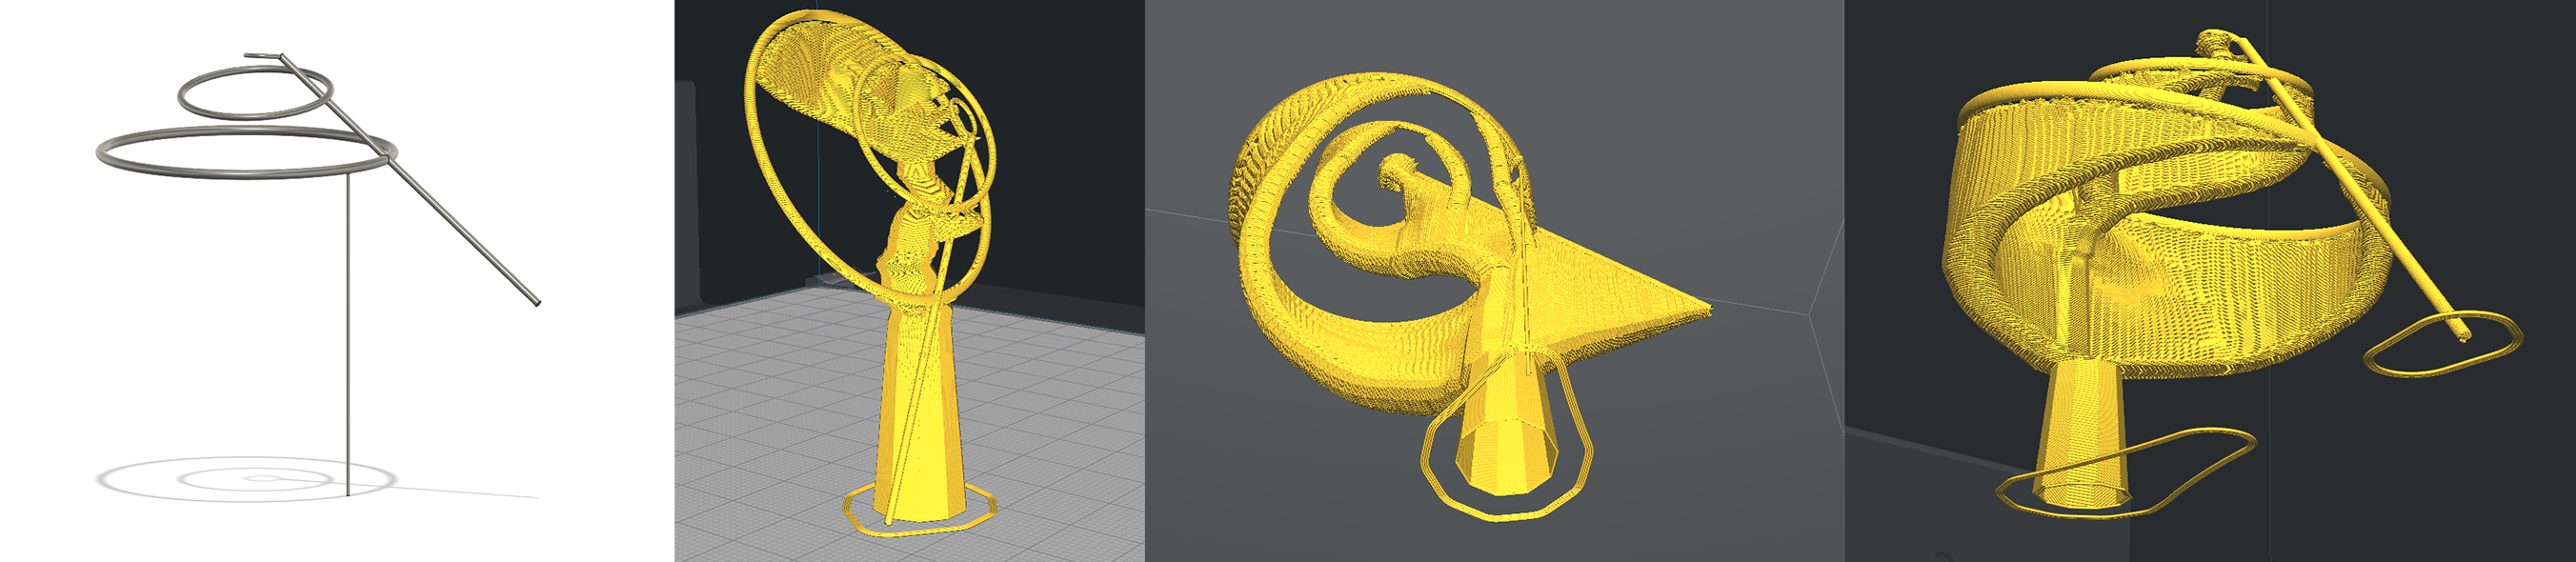
After the first few print attempts the first thing I noticed was that the tree support was entirely hollow. This could have its own applications but the main issue is that it makes the print very weak and it tends to break off in the middle of printing.
One fix for this is to set Cura to generate a "brim" in the build plate adhesion section. this supports the print and helps to keep it from breaking off.
The next step that I came up with was reversing the G code generated by cura back into an STL file so that it could be printed as a solid. For this you need special software which isn't very widely available and the one's I found are a paid service.
The software I used is called Voxelizer and they give a 3 month tree trial. So after creating an stl file from using Voxelizer I went back and created a solid print G code for the same model.
Machine Intervention:
Final Intervention:
For the intervention in which we needed to work in-between the the production process I thought it would be interesting to place something in-between the layers of a 3d print. I found this particularly interesting as this is essentially the basis for any 3d print, stacking layers on top of another to create an object.
The difficult part for me was thinking of what I might want to place between the layers to add something new to the object that was being created. The second difficult aspect I came across was of what to print.
What I eventually came up with was trying to make a type of 3d printed scale fabric.
I remembered having seen 3d printed fabrics that were entirely printed so I wanted to slightly adapt the idea by including real fabric within the print to allow for the flexibility but at the same time have the solid structures of the print.
I ended up testing three types of fabric, the first was with simple rectangular scales with no overlap and a very open mesh placed after the first two layers.
The second test consisted of diamond shaped scales with no overlap and a solid piece of nylon fabric being placed in between layers. This test ended up only working halfway as the top layer of the print did attach to the fabric but the bottom layer did not as the nozzle was not able to remelt the bottom print fast enough to attach the fabric to it.
In the third test I tried to combine aspects from the first two tests by using a mesh type of fabric that was much finer than the first test but still allowed for the filament being printed to fuse to the bottom layer, as well as including overlap within the layers to create more of a scale type fabric.
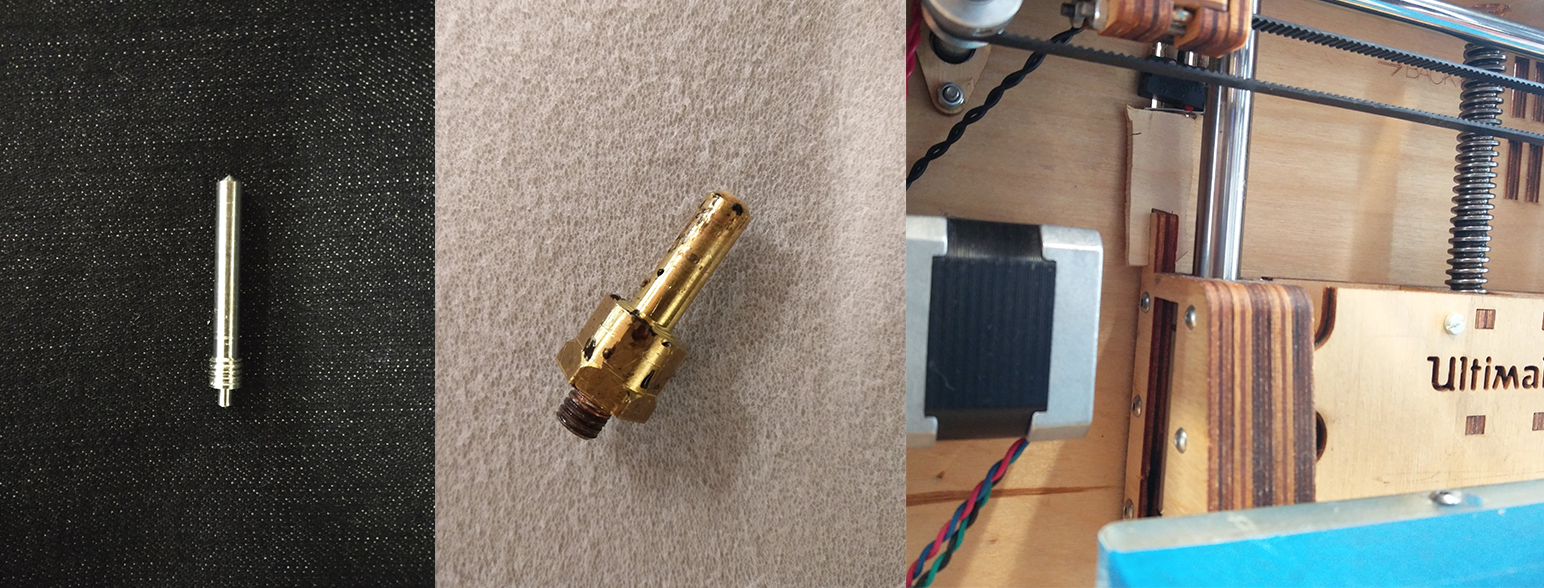
For the machine intervention we decided to work as a group and work together on refining the non-planar movement of the 3d printer. I had worked on this for my material intervention and suggested that we could try to keep working on this as a group as I had not been able to completely achieve the 3-axis movement.
At first Jake and I went to the metal workshop to make another improved nozzle that we could try to use to have more clearance from the work piece. Then we worked on generating the right type of gcode which the printer could then read. With help from Charlotte in the digilab the solution turned out to be creating 3d models in fusion and creating a generic CAM profile that the printer could then move by. The main drawback of this method is that as it is machining it does not account for the extrusion of the printer and as such it is not possible to control the extrusion while printing. It could be possible to just set the nozzle to extrude at a fixed pace but this would likely have mixed results.
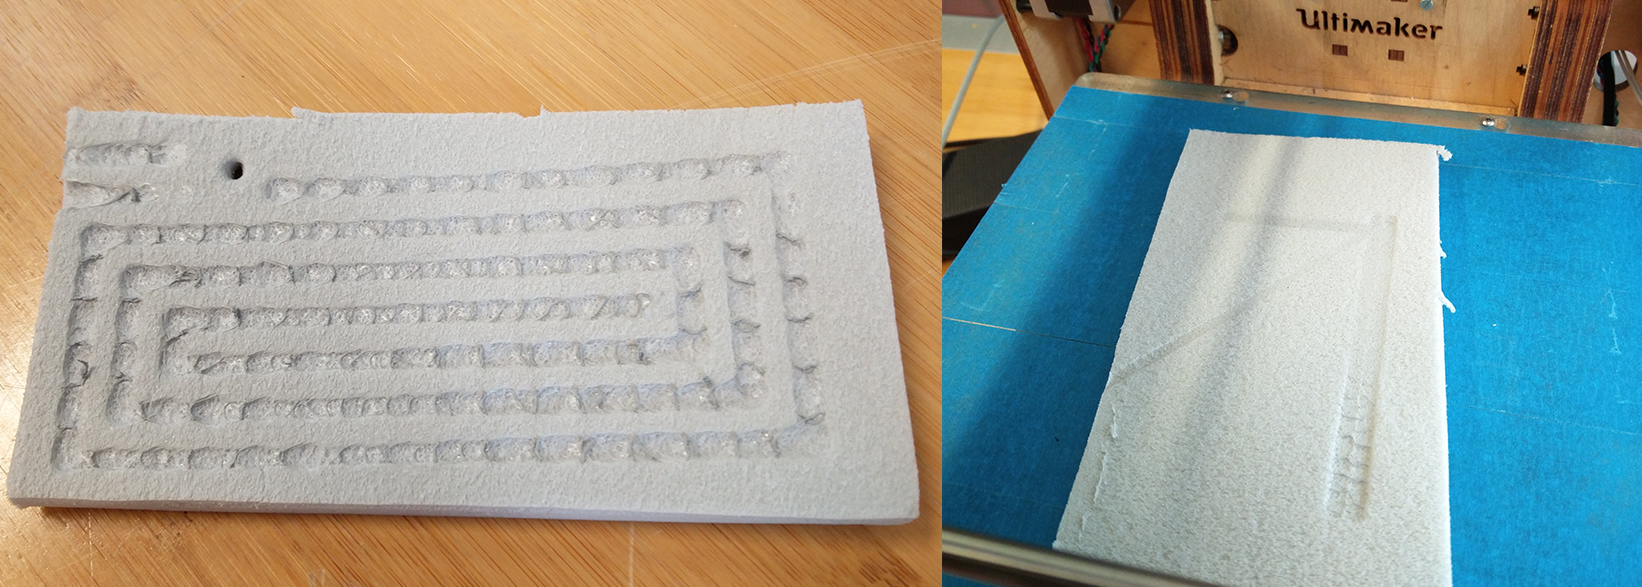
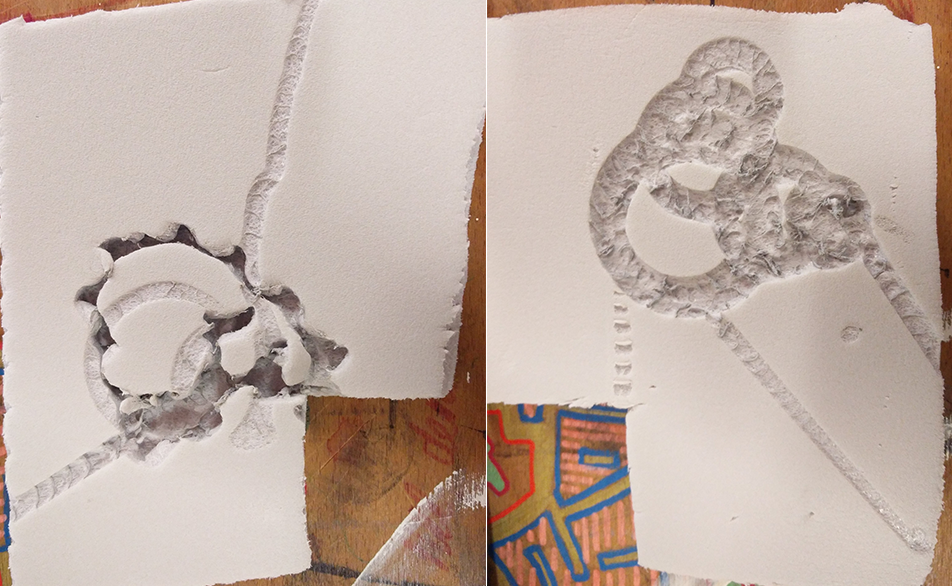
Because of this extrusion limitation we decided to reattempt the foam milling idea I had but this time we wanted to use all three axes to create the final model.
This ended up working to some extent but the result was not particularly refined. With a smaller nozzle or a foam cutting wire it would likely be more possible to create cleaner cuts and models with this method.
In the final intervention as a group we decided to continue working with the non-planar printing for the 3d printer. However this time we wanted to use this new type of movement in the printer for an entirely different use case.
After some consideration Merle suggested that we try to paint or create calligraphy with the printer. I found this particularly interesting as it requires a very fine control of all three axes to do well and in theory it would be possible to create very intricate and detailed paintings using a precise tool such as a 3 axis CNC machine like the 3d printer.
The main consideration then was to creating the models since in the end the printer still needed to have gcode to read. This was done by creating a 3d model in fusion that was a rough representation of the final shape and then creating a CAM profile to imitate the lifting and lowering motion of the brush stroke.
For me personally the most interesting results are the ones shown below as they appear to be a mix between something a machine and human could achieve. The first and third image show look most like something a person could do but but a lot of difficulty. However the middle image shows a kind of circular motion which is almost too perfect for a person to simply freehand but because its using a simple tool like a brush it still retains some imperfections that make it seem more human made, for me personally this is a very interesting contrast.
Final Intervention:
Assignment Reflection:
(a) your question (what are/were you questioning with the given sample),
(b) its relevance,
(c) its qualities and
(d) its potential (what potential does this sample have to further extend, research or apply)
G code Intervention:
A) I was trying to see if I could learn to control the generation of the tree support structure within Cura.
B) the relevance of these tests are due to the fact that there are significant changes being made to the way that the G code is being generated from the very beginning of the process. From the model that is imported into the slicer to the process of transferring the generated G code between the different programmes a lot of non-conventional g code is being created.
C) the main quality of this method is the fact that it allows essentially anyone to generate structures by themselves if given enough time
D) the potential I see for this method is to further refine the generated structures so that they may be something with a functional use. As of now they are mainly
just visually interesting but I think that given enough time there is a way to somewhat control this setting.
Material Intervention:
A) my original question was to see if I could potentially "mill" foam using the 3d printer hot end and by making the 3d printer move in all three axes.
However after some initial testing I decided to simply just keep to 2.5D movement.
B) I would say these tests are relevant because the material being used is completely different from what would conventionally be used in a 3d printer. The application of the printer is also completely different due to the fact that you are removing material instead of adding something layer by layer.
C) The main quality of this method turned out to be the texture of the foam after printing under certain conditions. If the right depth of cut is used and the same path is run repeatedly the surface layer of the foam will begin to develop a type of rough plastic residue.
D) the greatest potential I see for this technique would be some kind of CNC foam cutting rather than melting. The use of different nozzles and hot ends clearly works and it is possible to process the foam in a significant way. What is now left is to refine the tool which the machine uses to process the material and refining the machining operation, such as the generation of the g code and so on.
Production Intervention:
A) what it wanted to test in this intervention was to see if I could 3d print onto fabric and make a mix of 3dprinted fabric and normal fabric
B) I found this to be relevant due to the fact that it is a quite literal approach to the "in-between" the production idea. There are also a fair amount of applications for doing this, not only for clothing but also in anything in which flexible joints are required.
C) the main quality I see in these tests is that you can very easily create scale type materials, essentially the main benefit is having solid structures attached to
very flexible joints.
D) the main potential I see is with the mesh type fabric where it isn't a solid sheet, this allows for the most potential as the plastic and fabric are completely
fused, whereas the solid fabric prints are connected but not very strongly so.
machine Intervention:
A) In this intervention we chose to continue with the non-planar printing method I had attempted to work with in my material intervention. However this time the main
focus was to really work with the non-planar printing and making the printer move in all three axes simultaneously.
B) The relevance of this is that we worked on trying to make the 3d printer do something that it was not originally designed to do. It gave everyone a chance to work with what was essentially a 3 axis CNC machine and learn about its functions.
C) the main qualities in this intervention is that it allows anyone to get some type of 3axis cnc machine as long as they have access to a 3d printer.
in our samples we tried to continue with the foam melting/milling, however this time it was with X,Y,Z movement
D) the potential I see is with the foam cutting, and the idea of non-planar printing. with more testing it is likely possible to get the printer to extrude while
moving along all axes, and with the foam cutting with a better hot end and more appropriate foam it would likely be possible to achieve far more accurate results.
Final Intervention:
A) In the final intervention we worked to test what the other capabilities and applications there are to modifying a 3d printer to move along all three axes simultaneously. In this case we chose to work with calligraphy and making a way of getting the machine to do this for us.
B) I find that the relevance of this is that it shows one of the various applications there are for having a simple 3 axis CNC machine.
C) For me the main qualities I saw in our samples was the texture of the brush strokes, they really look like something that is both human and machine made. To me they look very precise and imperfect at the same time which adds a lot of value to it when compared to a simple print.
D) In terms of these calligraphy tests I think the main potential is in the texture, it could be used to create repeatable graphics that are still all unique as they all have very slight imperfections. Another application of this method is that in theory you would be able to paint onto three dimensional objects, the main challenge there would again be creating the right kind of G-code.
Assignment Reflection: